CoordinatorLayout的简单应用(材料设计新控件)
CoordinatorLayout字面意思为:协调布局,一般作为根布局使用。关于这个布局,记录一下两个用法,备忘。
一、配合 FloatingActionBar 使用
1
2
3
4
5
6
7
8
9
10
11
12
13
14
15
16
17
18
19
<?xml version="1.0" encoding="utf-8"?>
<android.support.design.widget.CoordinatorLayout xmlns:android="http://schemas.android.com/apk/res/android"
    xmlns:tools="http://schemas.android.com/tools"
    android:layout_width="match_parent"
    android:layout_height="match_parent"
    tools:context="com.example.joy.coordinatorlayouttest.MainActivity">

    <Button
        android:layout_width="wrap_content"
        android:layout_height="wrap_content"
        android:onClick="clickTest"
        android:text="测试"/>

    <android.support.design.widget.FloatingActionButton
        android:layout_width="wrap_content"
        android:layout_height="wrap_content"
        android:layout_gravity="bottom|right"/>

</android.support.design.widget.CoordinatorLayout>
以上布局文件样式如下:
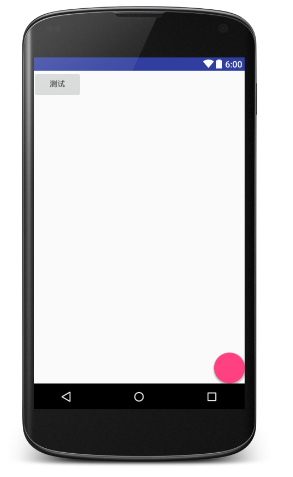
点击测试 Button 按钮,弹出一个 SnackBar ,代码如下:
1
2
3
4
5
6
7
8
9
@Override
protected void onCreate(Bundle savedInstanceState) {
    super.onCreate(savedInstanceState);
    setContentView(R.layout.activity_main);
}

public void clickTest(View view){
    Snackbar.make(view ,"这是一个snackBar",Snackbar.LENGTH_LONG).show();
}
测试效果如下:
注意,只有 FloatingActionBar 才有这种效果。
二、ToolBar+RecyclerView
布局文件如下:
1
2
3
4
5
6
7
8
9
10
11
12
13
14
15
16
17
18
19
20
21
22
23
24
25
26
27
28
29
<?xml version="1.0" encoding="utf-8"?>
<android.support.design.widget.CoordinatorLayout xmlns:android="http://schemas.android.com/apk/res/android"
    xmlns:tools="http://schemas.android.com/tools"
    android:layout_width="match_parent"
    android:layout_height="match_parent"
    xmlns:app="http://schemas.android.com/apk/res-auto"
    tools:context="com.example.joy.coordinatorlayouttest.SecondActivity">

    <android.support.design.widget.AppBarLayout
        android:layout_width="match_parent"
        android:layout_height="wrap_content">
        <android.support.v7.widget.Toolbar
            android:id="@+id/toolBar"
            android:layout_width="match_parent"
            android:layout_height="?attr/actionBarSize"
            app:layout_scrollFlags="scroll|enterAlways"
            >
        </android.support.v7.widget.Toolbar>
    </android.support.design.widget.AppBarLayout>

    <android.support.v7.widget.RecyclerView
        android:id="@+id/recyclerViewTest"
        android:layout_width="match_parent"
        android:layout_height="match_parent"
        app:layout_behavior="@string/appbar_scrolling_view_behavior"
        >
    </android.support.v7.widget.RecyclerView>

</android.support.design.widget.CoordinatorLayout>
代码如下:
1
2
3
4
5
6
7
8
9
10
11
12
13
14
15
16
17
18
19
20
21
22
23
24
25
26
27
28
29
30
31
32
33
34
35
36
37
38
39
40
41
42
43
44
45
46
47
48
49
public class SecondActivity extends AppCompatActivity {

    private Toolbar mToolBar;
    private RecyclerView mRecyclerViewTest;
    private List<String> mList = new ArrayList<>();

    @Override
    protected void onCreate(Bundle savedInstanceState) {
        super.onCreate(savedInstanceState);
        setContentView(R.layout.activity_second);
        mToolBar = (Toolbar) findViewById(R.id.toolBar);
        mRecyclerViewTest = (RecyclerView) findViewById(R.id.recyclerViewTest);
        final List<String> mList = new ArrayList<>();
        for (int i = 0; i < 50; i++) {
            mList.add("测试数据-----" + i);
        }
        LinearLayoutManager linearLayoutManager=new LinearLayoutManager(this);
        linearLayoutManager.setOrientation(LinearLayoutManager.VERTICAL);
        mRecyclerViewTest.setLayoutManager(linearLayoutManager);
        mRecyclerViewTest.setAdapter(new RecyclerView.Adapter<MyHolder>() {


            @Override
            public MyHolder onCreateViewHolder(ViewGroup parent, int viewType) {
                View view = LayoutInflater.from(SecondActivity.this).inflate(android.R.layout.simple_list_item_1, null, false);
                return new MyHolder(view);
            }

            @Override
            public void onBindViewHolder(MyHolder holder, int position) {
                holder.textView.setText("测试数据-----" + position);
            }

            @Override
            public int getItemCount() {
                return mList.size();
            }
        });
    }

    class MyHolder extends RecyclerView.ViewHolder {
        TextView textView;

        public MyHolder(View itemView) {
            super(itemView);
            textView = (TextView) itemView;
        }
    }
}
测试效果如下:
注意:如果将布局文件中 ToolBar 的属性改为 app:layout_scrollFlags="scroll|enterAlwaysCollapsed",则效果如下:

即:ToolBar 的属性设置为 app:layout_scrollFlags="scroll|enterAlways" 时,只要下拉 RecyclerView ,ToolBar 就会显示出来
设置为 app:layout_scrollFlags="scroll|enterAlwaysCollapsed" 时,只有下拉到第一个 item 后,ToolBar 才会显示出来
另:将 RecyclerView 改为 ListView 后,无此效果。
如果是其他控件,如 TextView, 用 NestedScrollView 控件套住,并为 NestedScrollView 控件设置属性 app:layout_behavior=”@string/appbar_scrolling_view_behavior” 也可实现效果。
但是 NestedScrollView 套 ListView 会出现冲突问题。(类似 ScrollView 套 ListView)
在Android Stuido中,这些属性名不能智能感知,手动敲出属性名后,属性值有智能提示。(eclipse未测试)
三、类似QQ空间动态页面顶部图片折叠效果
先上效果图
将上个布局文件中 ToolBar 用 CollapsingToolbarLayout 套起来,注意其中的几个属性,记住即可。布局文件如下:
1
2
3
4
5
6
7
8
9
10
11
12
13
14
15
16
17
18
19
20
21
22
23
24
25
26
27
28
29
30
31
32
33
34
35
36
37
38
39
40
41
42
43
44
45
<?xml version="1.0" encoding="utf-8"?>
<android.support.design.widget.CoordinatorLayout xmlns:android="http://schemas.android.com/apk/res/android"
    xmlns:tools="http://schemas.android.com/tools"
    android:layout_width="match_parent"
    android:layout_height="match_parent"
    xmlns:app="http://schemas.android.com/apk/res-auto"
    tools:context="com.example.joy.coordinatorlayouttest.ThirdActivity">

    <android.support.design.widget.AppBarLayout
        android:layout_width="match_parent"
        android:layout_height="200dp">

        <android.support.design.widget.CollapsingToolbarLayout
            android:layout_width="match_parent"
            android:layout_height="match_parent"
            app:contentScrim="@color/colorPrimary"
            app:layout_scrollFlags="scroll|exitUntilCollapsed"
            >
            <ImageView
                android:layout_width="match_parent"
                android:layout_height="match_parent"
                app:layout_collapseMode="parallax"
                app:layout_collapseParallaxMultiplier="0.1"
                android:src="@mipmap/ic_launcher"/>
            <!--parallax图片收起时会有折叠效果,如果设为pin,无折叠效果-->

            <android.support.v7.widget.Toolbar
                android:id="@+id/toolBar"
                android:layout_width="match_parent"
                android:layout_height="?attr/actionBarSize">

            </android.support.v7.widget.Toolbar>
        </android.support.design.widget.CollapsingToolbarLayout>

    </android.support.design.widget.AppBarLayout>

    <android.support.v7.widget.RecyclerView
        android:id="@+id/recyclerViewTest"
        android:layout_width="match_parent"
        android:layout_height="match_parent"
        app:layout_behavior="@string/appbar_scrolling_view_behavior"
        >
    </android.support.v7.widget.RecyclerView>

</android.support.design.widget.CoordinatorLayout>